This week I've revisited the animation for enemy 1, after receiving very helpful critique.
The main issue people had with my first animation was the fact that it was very static. People was expecting more dynamic movements from enemy 1. Something representing the enemy's "walk cycle", actually seeing the alien shell move along with the body and the big teeth opening and closing.
So what do you do when you have a finished animation and you need to apply so many changes to one character? My decision was to start over from scratch. The reason I made that decision is because if I have created something, can do it again but better using the experience from the previous attempt.
I have almost been able to fulfill all the things I wanted add to the animation. I have unfortunately crashed into a rather big problem. That problem can will be known as the video timeline in Photoshop CC.
It's been no problem animating with the video timeline and I understand it a lot better than I did when I first started out. The big issue with the video timeline is that when I try to transform a video layer PS wants to convert my video layer into a smart object, which causes the copied video layer to become un-editable.
Removing any ability for me to edit and draw on the specific frames that I need to draw on.
I'm not finished and I have to find a solution for mirroring an animation layer. After I find a solution for that issue, I can continue working on coloring the enemy.
One of the solutions would be to export all the individual frames over to Adobe Flash and continue working in Flash instead. However I'm not familiar with Flash, and learning all the tools might consume more time than I have.
The one solution I'm most certain that it will fix the issue with mirroring the video layer, is by saving the current animation I have at the moment, back into a key frame animation. This will be very time consuming and tedious, but it's a certain way to be able to mirror the frames i need to copy and continue on my work.
To summarize: I need to revert back from the video timeline workflow, to the key frame animation workflow.
*UPDATE 22:09*
After I uploaded the post, I had a talk with my fellow students and came to the realization that I've been working on a single key frame video layer instead of dividing them into separate key frames. So I've been basically adding my key frames in a single layer meant for the in-betweens.
I'm a bit annoyed that I've been missing such an important aspect of animating with video layers, but at least I managed to figure it out. Though mirroring a video layer for editing is still a mystery so far.
Thursday, February 26, 2015
Friday, February 20, 2015
Artifact Post #2
The "Power Ups"
For week 2 I chose to write about the items in our game and what design decisions I've made.
I've been finishing up the sprites for the items, that the player will be able to pick up in game. Cleaning up the sketches and altering the colors, as well as the refining the shapes.
Time Warp is one of the two power ups in the game. A power up item will change the gameplay in some way when picked up by the player. Time warp will slow down everything on the level except for the player character.
The original design for this power up was a white hour glass, inside a sphere with neon rings around it. This was a very early design of it and unnecessary details was probably not a high priority. The team who made the concept focused on having a clear representation of what the item did.
I wanted to stray away from those decisions a bit. The main focus would of course to have the items to be easy to recognize, but I wanted to add a little more detail. So what I did was to draw/paint and actual stop watch. Getting rid of the silhouette of what the item is and instead actually make a sprite of the actual object. In this case a stop watch.
Overcharge is the second power up in the game. Overcharge works in a different way, since it's mechanic is to have the player gun shoot much faster, that makes it easier to kill the enemies.
This design was one of the most difficult ones I made. I started out sketching a bunch of different ideas in my sketchbook, trying to think of how an overcharge ability would be represented as a visual object.
I couldn't actually decide on it so I created a sprite that had all the features from the original design, as seen on the previous groups one-page design. I actually don't mind the simplistic looking power up design.
The reason is that it differentiates itself from the other items. Which is also why I slightly warped the neon rings around he power up, giving it a different silhouette, so to not confuse it with Time Warp.
The Battery Pack is not a power up, but is instead used to replenish the players suit power. These battery pack will be scattered through out the levels for the player to find and use.
The battery pack was easy enough to design. Use the base idea that it's an actual object in the level for the player to pick up and use. For example, a battery is something that could be physically picked up and put inside a battery holder. Unlike an overcharge ability.
The Health Pack will have the same properties as the battery pack. However the health pack will replenish the players health bar, which is separate from the battery energy.
The health pack wasn't a hard task but it was an interesting one. That's because I had a lot of design options for it. A roll of bandage, small health box, generic red orb etc. so I thought of the idea of combining a syringe with an USB.
Something small enough to fit in a persons hand, then plug that into your arm, deplete it and you can heal wounds faster etc.
I've been finishing up the sprites for the items, that the player will be able to pick up in game. Cleaning up the sketches and altering the colors, as well as the refining the shapes.
The game currently requires 4 items:
 |
| Health Pack |
 |
| Overcharge |
 |
| Battery Pack |
 |
| Time Warp |
Time Warp is one of the two power ups in the game. A power up item will change the gameplay in some way when picked up by the player. Time warp will slow down everything on the level except for the player character.
The original design for this power up was a white hour glass, inside a sphere with neon rings around it. This was a very early design of it and unnecessary details was probably not a high priority. The team who made the concept focused on having a clear representation of what the item did.
I wanted to stray away from those decisions a bit. The main focus would of course to have the items to be easy to recognize, but I wanted to add a little more detail. So what I did was to draw/paint and actual stop watch. Getting rid of the silhouette of what the item is and instead actually make a sprite of the actual object. In this case a stop watch.
Overcharge is the second power up in the game. Overcharge works in a different way, since it's mechanic is to have the player gun shoot much faster, that makes it easier to kill the enemies.
This design was one of the most difficult ones I made. I started out sketching a bunch of different ideas in my sketchbook, trying to think of how an overcharge ability would be represented as a visual object.
I couldn't actually decide on it so I created a sprite that had all the features from the original design, as seen on the previous groups one-page design. I actually don't mind the simplistic looking power up design.
The reason is that it differentiates itself from the other items. Which is also why I slightly warped the neon rings around he power up, giving it a different silhouette, so to not confuse it with Time Warp.
The Battery Pack is not a power up, but is instead used to replenish the players suit power. These battery pack will be scattered through out the levels for the player to find and use.
The battery pack was easy enough to design. Use the base idea that it's an actual object in the level for the player to pick up and use. For example, a battery is something that could be physically picked up and put inside a battery holder. Unlike an overcharge ability.
The Health Pack will have the same properties as the battery pack. However the health pack will replenish the players health bar, which is separate from the battery energy.
The health pack wasn't a hard task but it was an interesting one. That's because I had a lot of design options for it. A roll of bandage, small health box, generic red orb etc. so I thought of the idea of combining a syringe with an USB.
Something small enough to fit in a persons hand, then plug that into your arm, deplete it and you can heal wounds faster etc.
| Sprite Sheet |
Thursday, February 12, 2015
Artifact post #1
Creating an animation for "Enemy 1"
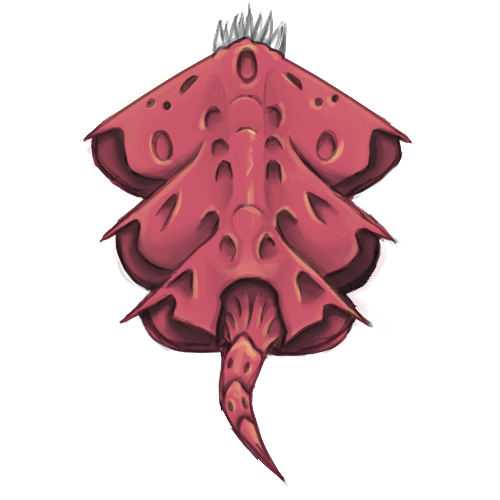
The artifact I've been working on during this past week has been the animation for "Enemy 1".
The animation I've made is going to be used for our the first enemy out of two in our game project.
It will represent our enemy moving around the level and towards the player.
 |
| Enemy 1 version 1 |
The animation takes it's inspiration from snakes, moving their tail back and forth, as well as an eel in water, since our game is set out in space with zero gravity.
My foundation for animating the enemy originates from the first sprite I made. That sprite had to be a representation of what the enemy would look like in-engine. So any movement wasn't necessary at the time.
After the test in-engine was successful I started working on animating the enemy. I used Photoshop CS6 during the entire process since it's the software I'm most familiar with.
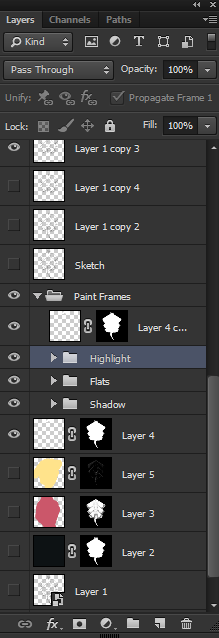 |
| 4 base layers, respective folders contains required layer copies for the frames (10 layers in each folder) |
The way I used Photoshop to animate was by creating"Frame Animation". The reason I used frame animation and not a video timeline was because of the multiple layers I had already created for the base sprite.
I have yet to figure out how to animate using layer masks with the video timeline option.
I approached the frame animation by creating a new layer for each frame in the animation. Painting every shadow, diffuse and highlight color by hand.
This approach was very time consuming but I had a lot of control over every single frame. I could edit every single detail if needed, the downside was navigating all the layers.
| The Frame Animation Timeline |
This was almost 40% of the work I put into the actual artifact, since it was one big hurdle to overcome. The lack of knowledge with animation was a big set back.
So I had to reference a lot of videos of what to think of when animating. It was a struggle but the end result is decent in my opinion.
I am going to create an iteration on the current animation based off our teachers critique today, animating the entire body moving in synchronization with the tail.
This will give a more believable look to the enemy, and since I have a good grasp on animating in Photoshop now the result will be easier to produce.
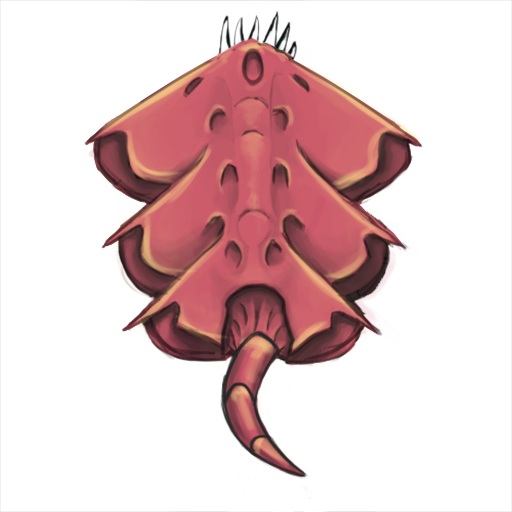 |
| Simplified Version (Enemy 1) |
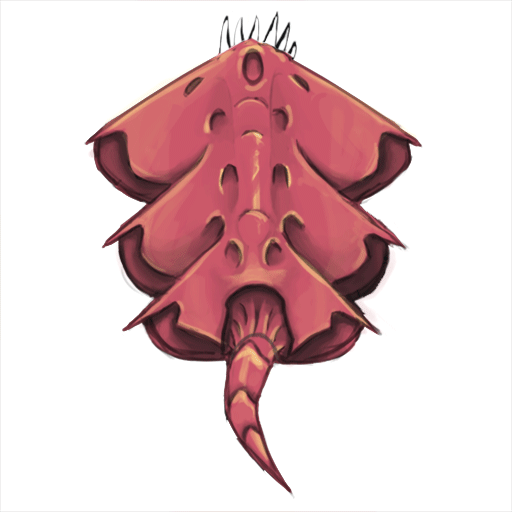 |
| Enemy 1 Animation |
Subscribe to:
Posts (Atom)